We all make mistakes while configuring applications, including Excel. Sometimes, we even won’t remember what mistake we made in the first place. In such scenarios, you can simply reset Excel settings.
MS Excel is a spreadsheet software that offers simplicity with utility. Hence, it is one of the best spreadsheet software we have seen to date. However, it is customizable. Thus, there are times when users add specific tools to aid their Excel workload.
Sometimes it works, and sometimes it doesn’t. Hence, they then want to reset their Excel to the previous iteration. There are a few people who love a particular version of the software. Hence, when they experience the update, they also want to go back. That’s why we have brought this article to aid such users who want to learn how to reset Excel settings.
What does resetting Excel settings do?
Resetting the Excel settings will bring all the changes to its configuration to the factory defaults. Every single customization you made will be brought back to where it was when you first installed the application.
Before resetting your settings, you should close all the open Excel files. If not, it might cause some issues.
When to reset Excel?
- Excel is not responding.
- Excel is extremely slow even with a fast system.
- You have a lot of add-ins that would take a lot of time to manually remove.
- The program is inaccessible or corrupted.
- You want to reset all the settings to their defaults.
4 Methods to Reset MS Excel
The following solutions will not only reset Excel settings but also Excel software. We urge the readers to proceed with caution.
Method 1. Using the Registry feature
The next method includes using the Registry feature. The necessary steps are as follows:
Step 1. First, close Excel and make sure to exit the program.
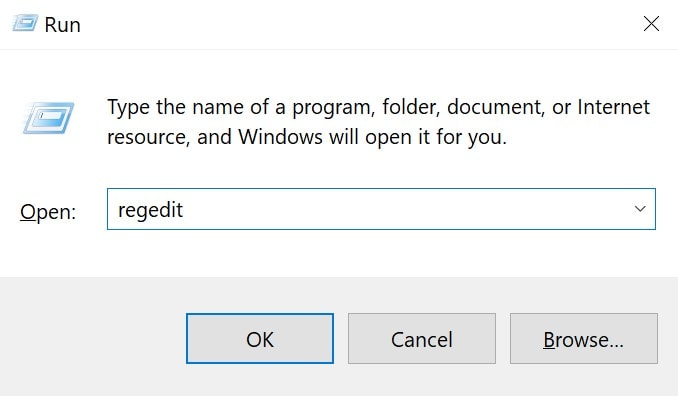
Step 2. Then launch the Run Command box. Now, there are several methods to do so. But we will use the simplest one. And that is to press Windows Key + R.
Step 3. In the Command box, type “regedit” and hit Enter. Click “Yes” if prompted. It will open the Windows registry editor.
Step 4. Now go to your Excel key. Beware though. These keys differ from version to version. Thus search accordingly, as per this guide:
- Excel 2007 – HKEY_CURRENT_USER\Software\Microsoft\Office\12.0\Excel
- Excel 2010 – HKEY_CURRENT_USER\Software\Microsoft\Office\14.0\Excel
- Excel 2013 – HKEY_CURRENT_USER\Software\Microsoft\Office\15.0\Excel
- Excel 2016, 2019 & the current Office 365 – HKEY_CURRENT_USER\SOFTWARE\Microsoft\Office\16.0\Excel
Step 5. Once you have located your key, expand it and select the “Options” subkey.
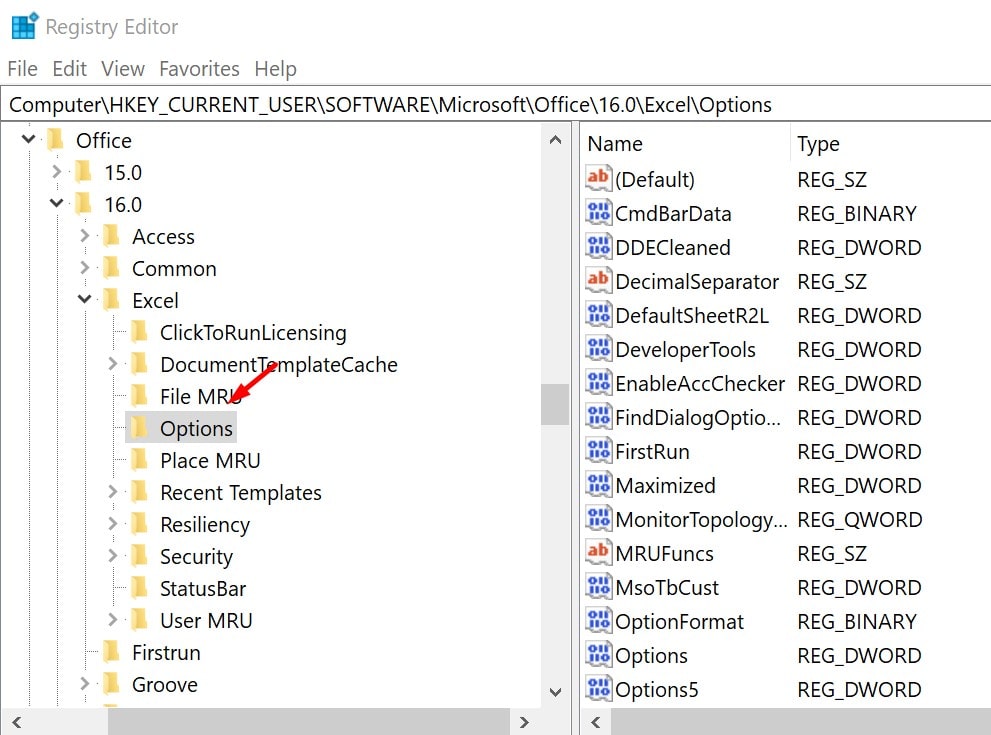
Step 6. Then delete it by right-clicking and choosing “Delete“. It will force Excel to recreate an Options subkey at its next rerun.
Step 7. Close the Windows Registry and launch Excel.
Method 2. The classic Uninstall/Reinstall
Finally, we have the penultimate method to repair any digital software, and that is, yes, as expected, the universal and classic approach to reinstallation. If everything else fails, we can always get another digital copy from the source, which will not only ensure our desired default settings but also terminate any other unforeseeable issues. Here’s how to uninstall and reinstall MS Excel.
Note: Although there are several methods for an uninstallation, we will be pursuing the most optimum one to save time. However, the user is free to make his choice as any uninstallation/reinstallation method works.
- First, download the Microsoft Support and Recovery Assistant (SARA) if you don’t already have it installed on your workstation.
- Then, wait for the download to finish and run the program.
- After installation, double-click on the app icon to launch it.
- Now, SARA will run a quick scan and troubleshoot any issues.
- Here, select the MS Office product you want to be replaced.
- The software will start the uninstallation process.
- After the uninstallation, restart your system.
- Finally, visit the official MS Office website or the Microsoft Store to download and reinstall the software. In this case, Excel.
Method 3. Using PowerShell
Now, for the last method, we are going for an obscure approach as it is only suitable or known to advanced users, and that is the PowerShell tool. It is a powerful tool that we will use alongside Cmdlets to remove the Excel folder from Registry. However, we caution readers to only adopt this method if they are familiar with PowerShell.
Step 1. Launch the Run Command box by pressing the “Windows Key + R“.
Step 2. Then type “PowerShell” into the box and press enter.
Step 3. Finally, enter the following command to remove MS Excel options.
For Excel 2007 users:
Remove-Item -Path HKCU:\Software\Microsoft\Office\12.0\Excel -RecurseFor Excel 2010 users:
Remove-Item -Path HKCU:\Software\Microsoft\Office\14.0\Excel -RecurseFor Excel 2013 users:
Remove-Item -Path HKCU:\Software\Microsoft\Office\15.0\Excel -RecurseFor Excel 2016 or later:
Remove-Item -Path HKCU:\Software\Microsoft\Office\16.0\Excel -RecurseReset MS Office Suite
You can also reset the Excel settings if you are using the MS Office Suite. This method will restore not only Excel but every MS Office software to its default settings. Here’s how:
Step 1. Go to the Start menu.
- Either click on the Windows logo in the bottom left corner of the screen.
- Or press the Windows button on the keyboard.
Step 2. Now click the Search box and start typing: Office.
Step 3. You can view the Office App on the screen. Right-click it.
Step 4. Then select settings.
Step 5. On the setting dialogue box, locate the Reset section.
Step 6. Finally, click on the Reset button.
Now you can use the default settings on any MS Office software, including Excel.
Reset Styles in Worksheet
Now we will showcase how to remove some exclusive settings or add-ons from Excel without removing the software. Given here is the procedure to reset Styles in an MS Excel worksheet.
Step 1. First, select the whole worksheet and copy it. Use “Ctrl + A” to select all and “Ctrl + C” to copy.
Step 2. Now, open a blank worksheet. Click on “File” and then “New“.
Step 3. Right-click the A1 cell to display the drop-down menu. From the options, click on Paste and click on the “Fx” clipboard.

Doing this preserves the formulas, texts, and numbers.
Step 4. Finally, click on any cell containing a function and look at the “Fx” field above the worksheet. To confirm that all the previous functions are indeed intact.
Step 5. Then save the worksheet as a new file.
Removing Excel Add-Ins
The following method can aid users to remove Excel Add-ins. All the user needs to do is:
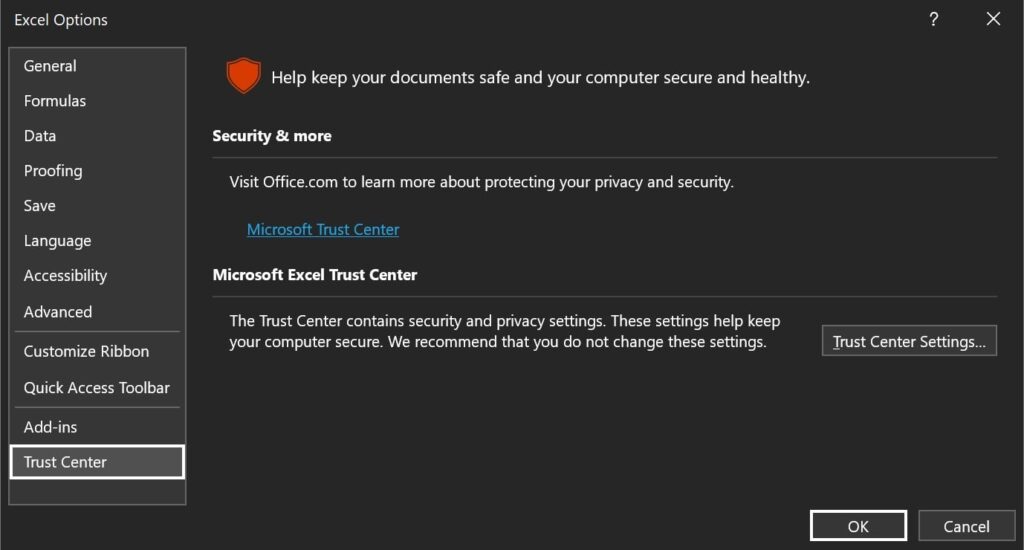
Step 1. In the worksheet, click on “File” and select “Options“.
Step 2. After that, click on “Trust Center” and select “Trust Center settings“.
Step 3. Now, click on Add-Ins, and toggle the checkbox beside “Disable All Application Add-Ins.”
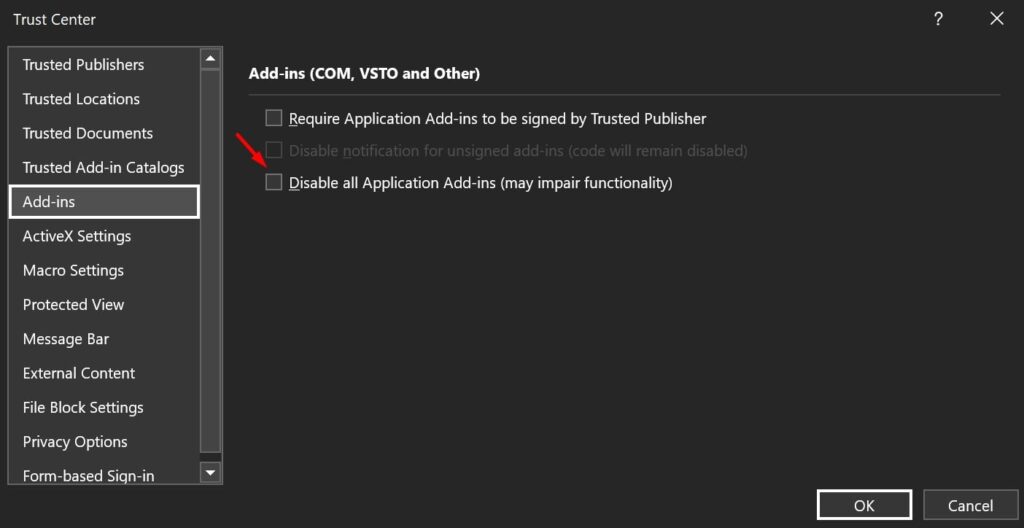
And you’re done.
FAQ
Resetting Excel settings will not result in data loss. Make sure that you save all your unsaved worksheets before you reset Excel. If you are opting for the methods such as re-installing the software, any unsaved recoveries utilizing the Excel auto-recovery feature may be lost.
Unless you have a huge amount of add-ins that are slowing down Excel or corrupting the program, you shouldn’t reset Excel just to make it faster. You can read some Excel tips to know more about using the software better.